Monday, April 28, 2008

My new spindle arrived!

On Friday afternoon I ordered my new Golding drop spindle. And it arrived today! I was so excited I just had to play with it. I felt like I was throwing purls before swine by using the crappy roving I had on had but I just had to play. (I ordered some spiffy hand dyed but it hasn't arrived yet)

Anyways, I have to say I LOVE THIS SPINDLE! It spins for ever and so smoothly! It is so light, I was instantly getting smoother finer yarn that I could ever hope of getting on my old spindle, I can't wait until the good roving arrives.

Stats:
Golding spindle
Micro 2" model, .8 oz.
Purpleheart whorl "tsunami" design.

I know I'm just a newbie, but if you are looking for a new spindle, I cannot recommend Golding enough. It's like a dream to work with, and so pretty!


a comparison with my old spindle. In a post I made to LJ, when I mentioned I wanted this spindle, tashabear said it was one hell of an upgrade. I didn't realize how true that was! I look at my old spindle now, and can't believe I managed to make halfway decent yarn with it.
Photobucket


the whorl
Photobucket


and a crappy picture of just how fine I could spin.
After a little more practice I was getting even finer, and I'm sure it improve even more with the better roving.
Photobucket

Wednesday, April 23, 2008

Spinning!

A couple of years ago I bought a beginners drop spindle at Rhinebeck. I spun up a really bad and lumpy bulky skein on it then promptly put it aside for something else. Then a little later I picked it back up and started spinning Fur from our American Eskimo Cayenne. It was difficult since I had no way to properly prepare it, and the staple length was short and the spindle was heavy, so I didn't do it too often and for very long.

Then the other day while I as cleaning out my stash I found a bag of unlabeled bats that I had bought long ago on e-bay, and decided to pull out the spindle again.

The wool wasn't very well prepared, there were a lot of little matted lumps in it, tons of vegetable matter, and it was a little sticky from all the leftover lanolin. But it was all I had and I wanted to spin! I decided that if I was really going to take up spinning seriously I wanted lace and sock weight. So that's what I aimed for.

Here it is on the spindle before I took it off to ply:
Photobucket

And after plying:
Photobucket


With penny:
Photobucket

stats: about 102 yards, 17-20 wpi, unknown breed of wool.

It's not perfect by a long shot, there are a lot of too thick and under spun bits from the beginning but towards the end I was getting really happy with my consistency, but it kept breaking and pulling apart if I got as thin as I wanted. From my research I guess that was because my spindle was just too heavy. So I think I'm going to get a new spindle - I was looking at these specifically the Tsunami in purpleheart.

When we go into town today, I'm also planning on going to the library to take out some books on spinning. Ohh I'm so excited!

Wednesday, April 16, 2008

A new skirt!

I hate clothes shopping. It's annoying.

I'm a big girl, and it's always difficult to find clothing that 1) fits me and 2) looks nice.
One of my favorite types of clothing during summer time is skirts. They are easy to take on and off; they cover my flabby pale legs, and are amazingly cool, even on the hottest days. (Way cooler and more comfortable than shorts even, because skirts allow air flow)

I especially like the bohemian tiered skirt look, because they are looser, look better on my figure and allow more freedom of movement and air flow.

But I've had a very difficult time finding many that are both the appropriate colour palate for summertime (I prefer lighter colours during the summer, but not white, I am too much of a klutz to wear white) and that match shirts that I already own (I have more than enough tank tops and t-shirts, thankyouverymuch) AND that will actually fit over my rather large bottom.

My solution?

Make my own!

Photobucket

I've scrounge the internet and library and bookstores for good skirt patterns, and I found a couple of resources that discuss my favored skirt design. And a couple of weeks ago I finally got up the nerve to try it out.

So I went to Jo-Ann's Fabrics and got a pretty fabric, and some elastic, brought it home, cut it out and make a skit!

It was way easier than I expected, and I'm incredibly happy with the results. AND with a coupon, (and not counting labor, since it gave me something to do, and was fun) it came out to WAY less than I've paid for similar skits. YAY!

The skirt isn't perfect, but I'm happy, and already have the fabric to make another one!

Photobucket

if you're interested, here's the tutorial for how I made it

Monday, April 14, 2008

Fnished Flutterbyes

Yay!

Since the weather is getting nicer around here, I figured it was high time I got off my duff and finished the crochet butterfly top I started a while ago.

Photobucket

All I really needed to do was the sleeves and edging. And since I decided to just do plain Sc around the main body it was a snap. The sleeves on the other hand got ripped out several times before I was happy. See, I have flabby arms, and am very particular about my sleeves. But I eventually got it.

Photobucket

I am so incredibly happy with this top, I just want to wear it all the time, but it's still a bit chilly.
::pout::

original pattern by Proper Trappings and available here(ravelry link)

Sunday, April 13, 2008

Bunnies, Bunnies, it must be BUNNIES!*

I've been up to a lot lately, nut for some reason not up to posting, but I've finally getting all my thoughts in order so prepare for a bunch of posts.

First up? BUNNIES!

*ahem*

I've knit a few more bunnies from this pattern I really like it and think the product is absolutely adorable.

One of my friends just had a baby and I think I'll send one to her.

Photobucket

The first one is from some random Lion Bouclé that was given to me from a lady at knit night. she didn't like it and wanted to get rid of it, and al I could think of was a bunny. I lost my pattern about half way through so I fudged it. and you can kind of tell, it's head is a little too small. Ah well.

Photobucket

The next one is a bunny I started a while ago but ran out of yarn just as I was starting it's second ear. I had a heck of a time finding the matching yarn for it, but I finally found some that was 'close enough' while I was wandering around Jo–Anns the other day.

I think the off colour ear give him a kind of charm, don't you think?


*bonus points of you can name where iI got the title from

Tuesday, April 01, 2008

change purse tutorial

changepursetutorial finishedwchange


as promised, here's the tutorial.pattern for the little change purse I made yesterday.
be warned there are a lot of pictures. (you can click on each picture to get a bigger view)
if you would like, you can also view the tutorial as a slide show from my flickr album


changepursetutorial materialsgather your materials
you will need:
2 4x6 pieces of fabric, a short zipper (length isn't too important, so don't worry if all you can get is a longer zipper), sewing machine and thread, scissors and an iron.


changepursetutorial ironfold each of your pieces of fabric in half, with right sides together. Press.


changepursetutorial step2With zipper closed, place the zipper in the fold of one of your fabric pieces. Center the fabric on the zipper, making sure the pull tab is out of the way.


changepursetutorial step2halfSew along the folded edge


changepursetutorial step2doneUnfold fabric and refold wrong sides together, press. (be careful not to melt your zipper!)


changepursetutorial step3Repeat on the other side of the zipper with your other piece of fabric.


changepursetutorial step3donepress again.


changepursetutorial step4
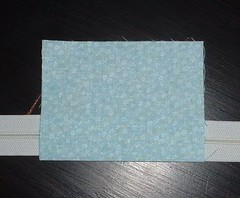
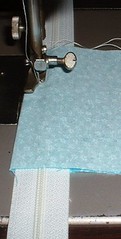
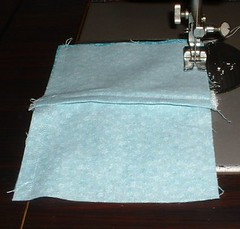
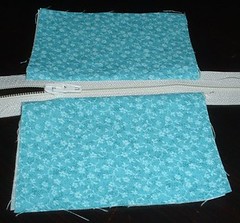
Unzip the zipper so that the pull tab is "inside" the fabric.


changepursetutorial step4halfFold the zipper in half so that the teeth are on top and the fabric pieces are together.
Sew each end of the zipper several times along the edge of the fabric.


changepursetutorial step4doneTrim away the excess zipper, being careful not to cut where you just sewed everything together.


changepursetutorial step5Making sure that the zipper pull tab is in the center of the fabric. Unfold the very top and very bottom piece of fabric so that you now have two flaps of fabric (right sides together) above and below the zipper.


changepursetutorial step5halfSew along first one side, then the other side. Making sure the back stitch several times over the zipper to secure it.


changepursetutorial step5doneSew along the top edge (the piece that will be the outside of your purse, if you are unsure which end this is, it's the one where you can see the top of the zipper and the pull tab from.)

Then sew along the bottom edge, leaving about an inch gap unsewn in the middle. Trim your corners. And trim the ends of the zipper flush with the fabric. (not shown in the picture)


changepursetutorial step6Pull everything right side out through the gap you left in the inside bottom edge.
Make sure to poke out your corners. And sew up the hole.


changepursetutorial finishedwhandPush the lining fabric inside the change purse, making sure everything is neat and tidy, and admire your handiwork!

Powered By Blogger

Creative Commons

Creative Commons License
This blog and everything contained within is licensed under a Creative Commons Attribution-NonCommercial-NoDerivs 2.5 License.